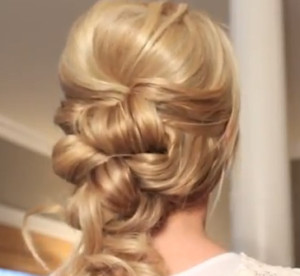
 One of the best things about attending a wedding is that it’s a chance to look your absolute best. It doesn’t matter if you’re the bride, mother of the bride, grandmother of the bride, or just a guest, having the best outfit and hairstyle is imperative. I’ve covered the outfit part of this equation many times in the past (including mother of the bride dresses, bridesmaid dresses and even wedding gowns). So for today’s post, I thought I’d focus on the hair – specifically, how to create an easy yet elegant DIY wedding updo for long hair. Immediately below is a step-by-step video tutorial that will show you how, and I’ve listed out the steps beneath the video for your convenience.
The main idea behind this wedding hairstyle is that you will be taking all the hair from the sides, pulling sections to the back, looping them, and pinning them into place at the back of the head. For an extra romantic look, you could optionally incorporate gentle waves with your curling iron. To create this stunning wedding updo, you will need some bobby pins, comb, a paddle brush, hairspray, and (optionally) a curling iron.
The first step is to backcomb the top section of your hair to achieve a maximum amount of volume in this section. Then take a paddle brush and gently smooth over the section of hair that you just backcombed, and gather and secure it at the back of your head with bobby pins (crisscross the pattern for extra hold) so that it forms a nice bun as demonstrated in the tutorial.
Next, take a 2-inch section of hair that is near your left ear and smooth it out. Then fold it around your finger (half way, not an entire loop), and pin the folded area into place at the back of your head where the other bobby pins are located. Again, please watch the video (1:15 mark) if this is not clear. Then do the same exact thing on a 2-inch section near your right ear.
Now take the loose section of hair hanging down at the back of your head and split it into 2 sections. Grab the first section near the first set of crisscrossed bobby pins, roll it upward around your fingers, and then pin the loop in place near the original bobby pins. Repeat the process for the other section. Now take the bottom sections of your hair on each side and create the same half loops as you did for the 2-inch sections near each ear (i.e., fold the hair halfway around your finger), and pin each folded area at the back of the head underneath the original bobby pins. Do this for any other side-sections of hair as well.
Once you have all the curls / loops from the sides pinned in place at the back of your head, curl the remaining loose sections that are hanging down with your curling iron. You could either leave these wavy sections hanging down as they are, or you could pin these sections to the bun for a complete updo look. Finally, spray with a bit of hairspray to keep the hairstyle secure all day (and night) long. And as they say in the movies, that’s all, folks!
I hope you enjoyed this wedding updo tutorial. Good luck, and most of all – enjoy the wedding!


Speak Your Mind